Intro
Even with the unlimited potential of technology these days, tile based graphics remain a powerful and efficient way to create game worlds. If you are new to making tiles I suggest reviewing Pixelblog 20, in which I introduced the fundamentals of tile making with top down tiles, and how to best make them with specific software. In this lesson I will guide you through tile creation in the most common projection used in 2D games - the side view.
From the foreground to multiple background layers, in the following tutorials I present a variety of tiles for creating a complete environment.
SLY16
Due to the limitations of consoles like the Megadrive, 16 color palettes really hit a sweat spot with pixel art aesthetics. While I’ve made several specific palettes within this range, Sly16 checks all corners of the color wheel. The mindset was to create a retro-inspired limited palette you can create entire game worlds with. To put it to the test, I created everything in this feature with it. To my surprise I never really felt a need for more colors, and the limitation actually frees me from excessive deliberation with color choice.
I started by plucking colors from my Mondo palette then refined with testing, and the inspiration of other palettes. I’m always open to future revisions, but I’m quite happy with the current state of the palette. Patrons can download Sly16.
Basic Ground Set
As with my previous tile lesson, I’m using 16x16px tiles. This is one of the most common tile sizes for pixel art games, as it is small enough to work efficiently with but still packs enough pixels for a surprising amount of detail. Also, it’s always a safe bet to work with a size that is a power of 2, as these values have the most consistent multiples, making it easier to create balanced textures. Ultimately, you can make tiles any size you want. They don’t even have to be square, but why complicate things? The basic guidelines I suggest are that your tiles are an even number and square. It all depends on the look you are going for.
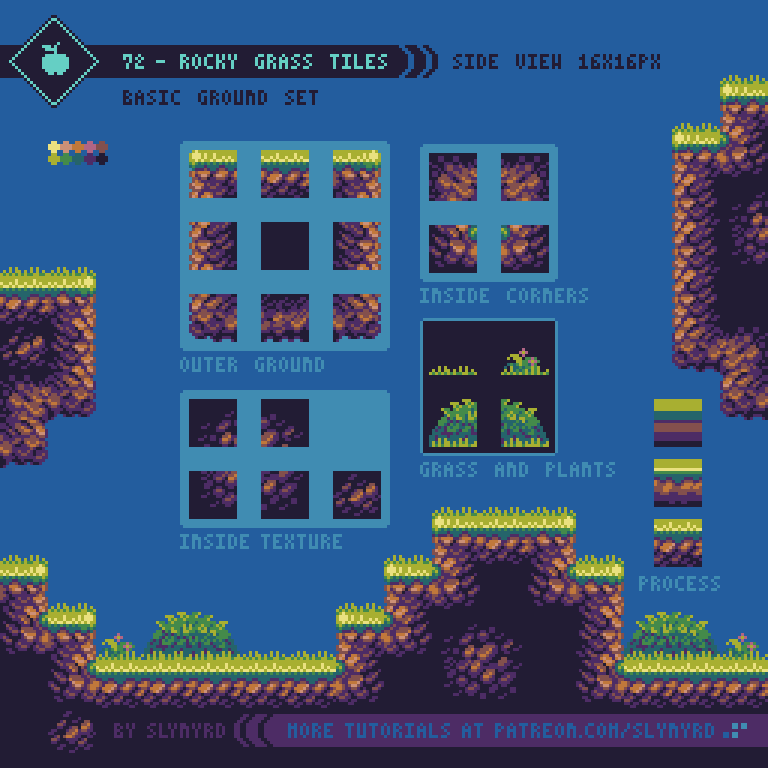
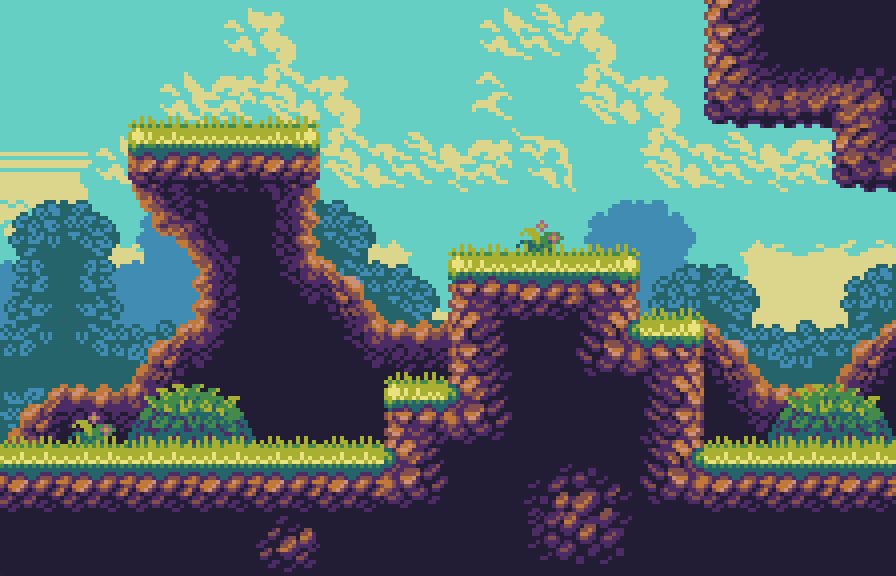
I start with very basic color blocking to capture the most prominent fields of color and define the orientation of the tiles. It is in this first step where I establish a region on the outer face of the tile that appears to tilt towards the background. For example, on the ground tiles with grass, it appears you are seeing part of the grass from the top, like a 3/4 tilt. Furthermore, the corner tiles tilt on the two outer sides, appearing like a cabinet projection. Creating tilted edges like this is critical to achieving depth.
In the rough clustering phase I blend the clusters into the color fields to imply the general textures and begin to smooth out the color transitions.
In the fine details phase I add highlights, push the shading, and refine the clusters to be more descriptive. However, I still like there to be some good chunky clusters in there. Too much detail can end up looking blurry, or noisy.
You can see the grass would have an abrupt flat top if not for the extra grass and plant tiles. The player would walk on top the ground tile and overlap the grass tiles, making it appear like he’s really a part of the environment. This shows how you can add varied edging to your tiles while preserving clean collision bounds.
Platforms and support tiles
level design possibilities are greatly opened with the ability to place a stand alone platform anywhere on screen. However, my rational nature makes it hard to accept floating platforms without some kind of logical explanation, like it’s imbued with magic or hover technology. These explanations are acceptable to me for moving platforms, but for static platforms I usually go out of my way to visualize a logical support structure for platforms.
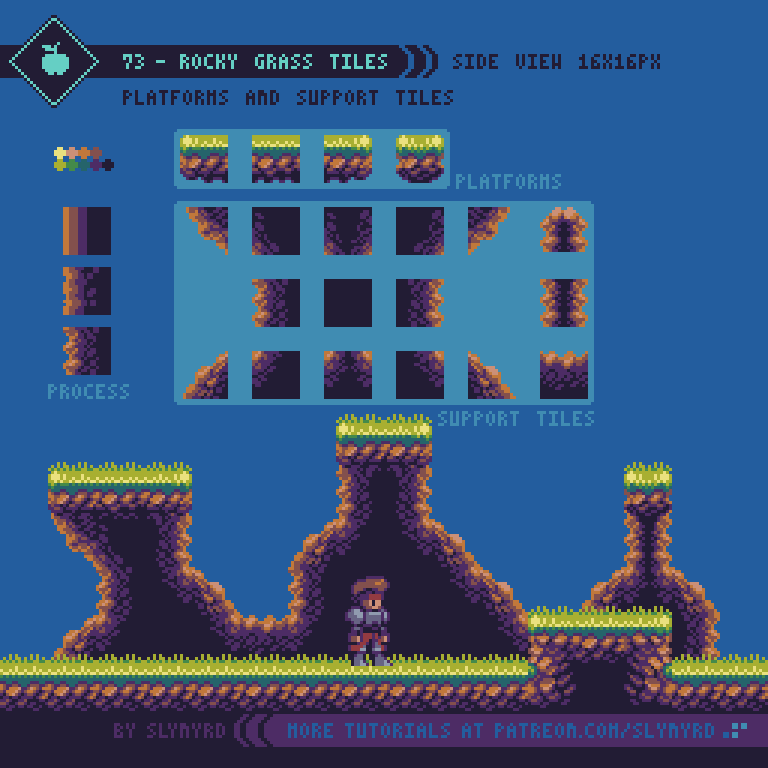
The support tiles are designed to look like they are in the immediate background so it’s obvious you can pass in front of them but close enough they appear to be connected to the platforms. Besides providing a logical support structure to platforms, these tiles also add an interesting background layer, which can also be used purely for visual interest without platforms attached.
Background Tiles
Of course, the goal with the background is to create depth, but also to further contextualize the environment without compromising the readability of the foreground. Moreover, I like to make several simple background layers, and let the sum of the parts create visual richness, rather than having only one or two very detailed background layers. The more layers you have the more depth you can achieve from parallax scrolling, but just a few is usually enough for convincing depth.

Overlap and the use of subtle outlines allow me to get a lot out of my 16 color limit. Had I used I larger palette I could push for more detail and even more layers in the BG to capture a more realistic sense of atmospheric perspective. However, I’m pleased with the depth I’ve achieved with limited colors, and quite like to colorful retro look. Put it in motion with parallax scrolling and you’ll really sink into the image.
You can see my clouds bleed into the background in places but there is always enough information to imply the shape of the clouds. I would definitely avoid color bleed on sprites and things you interact with, but it is acceptable with passive background elements so long as the object remains readable.
KEY POINTS
These are mostly the same points I describe in my top down tiles lesson with a few new tips relevant to side view tiles.
Balance - Strive to achieve a homogenous distribution of visual weight within a tile. If any area of the tile has a visual dominance the pattern will become too obvious. Include clusters that overlap the edges and loop around the tile to help hide the seems.
Consistency - Define key clusters and shapes and repeat them in several cases to create a pleasing consistency. Avoid touching key clusters with other key clusters, as they clump into different irregular clusters and create noise. Touching corner to corner is okay.
Limit colors - You only need a few colors to make a rich texture. Too many colors and the texture will become blurry. Also, strong contrasting colors in the case of a texture pattern may result in displeasing noise.
Contrast - Consider contrast when combining different textures in the same environment. A busy texture next to another busy texture may exhaust the eyes with too much noise. Negative space is your friend.
Reflect - Often tiles can simply be mirrored to create tiles of different orientation. This saves time, and the symmetry creates a pleasing consistent look. However, this will only work if you have a symmetrical light source, or ambiguous omni lighting. In may example, light is always coming from directly above, making it possible to mirror right and left side tiles.
Resolution - You can make tiles any size you want, but the larger the more laborious. Anything over 32x32px seems like overkill for pixel art. 16x16px is probably the most common size and is sure to do your pixels justice.
Variants - Variant tiles of the same use add interest and reduce repetition. A well designed tile set shouldn’t need a lot of variants, but at least one variant of tiles that are often strung together in repetition will suffice. For example, my clouds have two different middle bottom tiles that I mix up to keep it looking organic.
FINAL THOUGHTS
Building off my experience from creating the top down tile series, I found the process to go quite smoothly. Also, I have worked with side view tiles in the past for a couple of game dev projects, and I’ve become more proficient with using Pyxel Edit, a pixel editor focused on tile creation. Check out Pixelblog 20 to learn more about it.
Making tiles can feel very tedious at the start, but once you have enough tiles to start making something they become a powerful and fast way to create large environments with relatively few assets. Once you feel that power it becomes addictive and you just want to keep building the world. I’d love to expand on this concept in following lessons much like the top-down series. Characters, animations, items, ui, different environments; let me know what subject you are most interested in learning.

RESOURCES
Was this article helpful? If you find value in my content please consider becoming a Patreon member. Among many other rewards, Patreon members can access resources to compliment my tutorials. But most importantly, you allow me to continue making new content.
Assets featured in this Pixelblog are available in Side View Rocky Grass Tile Pack
Get the original palette used in this lesson- Sly 16
Source files used in the making of this Pixelblog are available in Side View Tiles Source Files
Get caught up on all my downloads
If you're not ready to commit to the subscription model of Patreon, make a one-time donation and receive exclusive art and resources. Help continue the content by providing me a living. Thank you!
-By Raymond Schlitter