
Intro
Prepare to step into a world of swords and sorcery, where fabled creatures lurk in the lands seen from grand castle spires. Indeed, it would be treacherous to venture out alone without sword, armor, and the will to fight. Steel your spirit as we depart on a fantastic pixel outing.
Free from the pressure of animation, this feature focuses on the pixels. Of course, sound fundamentals are always in play, but without the laborious demands to create multiple frames that evoke clear motion, the dial gets turned up on the details. By integrating fundamentals of anatomy, color, and pixel clustering, advanced results can be achieved by incremental steps. Proceed with patient discipline, and the treasure will be yours!
Knight
Ensconced in lustrous armor from head to toe, the knight figure continues to captivate the imagination centuries after they served the upper class as mounted warriors. While they hold a real place in history, their armor clad visage is often romanticized in the realms of fantasy. Taking on both heroic and frightful forms, the knight is the quintessential avatar for high adventure.

It’s always helpful to establish a fundamental anatomy model before jumping into a fully posed final character design. If you have exceptional talent, or keep routine anatomy practice, you might comfortably skip this step, but since I can’t claim either, the process starts with a front facing anatomy breakdown. Especially with bulky armor and clothing, the design will most likely suffer without establishing the underlying figure. Furthermore, I also breakdown the prominent armor pieces before dressing up our good sir.
After establishing the basic armored figure, the detailed process of shading and coloring begins. First, define the light source with simple, prominent clusters that capture the overall contrast. Next, refine the lighting by blending colors with more detailed clusters. Avoid too many small scattered clusters, and overly gradated color transitions to prevent unnecessary noise, and blurred features. The idea is to push the detail just far enough until the mind can fill in the rest. Lastly, outline the character if it needs more pop on the desired background. Start with a simple one color outline, then blend it lighter or darker according to the adjacent colors within the outline.
I take the same approach for the posed version. It starts with the simple dummy figure in the desired pose with the addition of a sword. Next, apply the armor by carefully reimagining the changes in perspective compared to the straight forward version. Repeat the detailing process while accounting for the shift in pose. This pose doesn’t stray too far from the straight on version, so it’s not too difficult to imagine the subtle shifts in perspective and lighting. The same process can be used for more dynamic poses, but will require strong vision to accurately distort the design. Use references!
Monsters
The descriptions of mythical monsters may vary across cultures, but the universal inclusivity of beastly legends speaks from a place of truth. Fact or fiction, all extraordinary beings are fair game in the world of fantasy.

Anatomy knowledge will aid the creation of these relatively humanoid baddies, but a playful imagination and willingness to deform features is vital. With the flexibility provided by their imaginary nature, I felt comfortable skipping the anatomy breakdown, and immediately blobbing out the final design with a few of the desired colors. After I completed the final designs I reverse engineered the process into distinct steps to make a digestible tutorial. That’s usually how these things go, but my organic process does often start with basic color coded dummies when it comes to character design.
Of course, references are almost always part of the equation. I always start with a basic vision in my head, then I source multiple references to fuel the inspiration. Usually, I use one main reference, along with several complimentary references that help inform modifications for my personal vision. Quality input is essential, but it ultimately comes down to the output on the canvas. In other words, don’t get hung up on the details of a reference, and let your own intuition flow out from fundamental principles.
It’s all about balance. Don’t rely too heavily on a single reference, but don’t let the pride of your vision blind you from outside influences. Don’t agonize over every detail mid-process, but don’t rush for immediate results. Ingrain and exploit the conventions, but don’t be afraid to bend the rules. Listen to critique, but don’t react to every opinion.
Castle
After a day of XP grinding, it’s good to have a secure castle to come home to. Both a fortress, and a fairy tale home, the grand towers, turrets, and spires of these fantastic structures inspires endless possibilities.
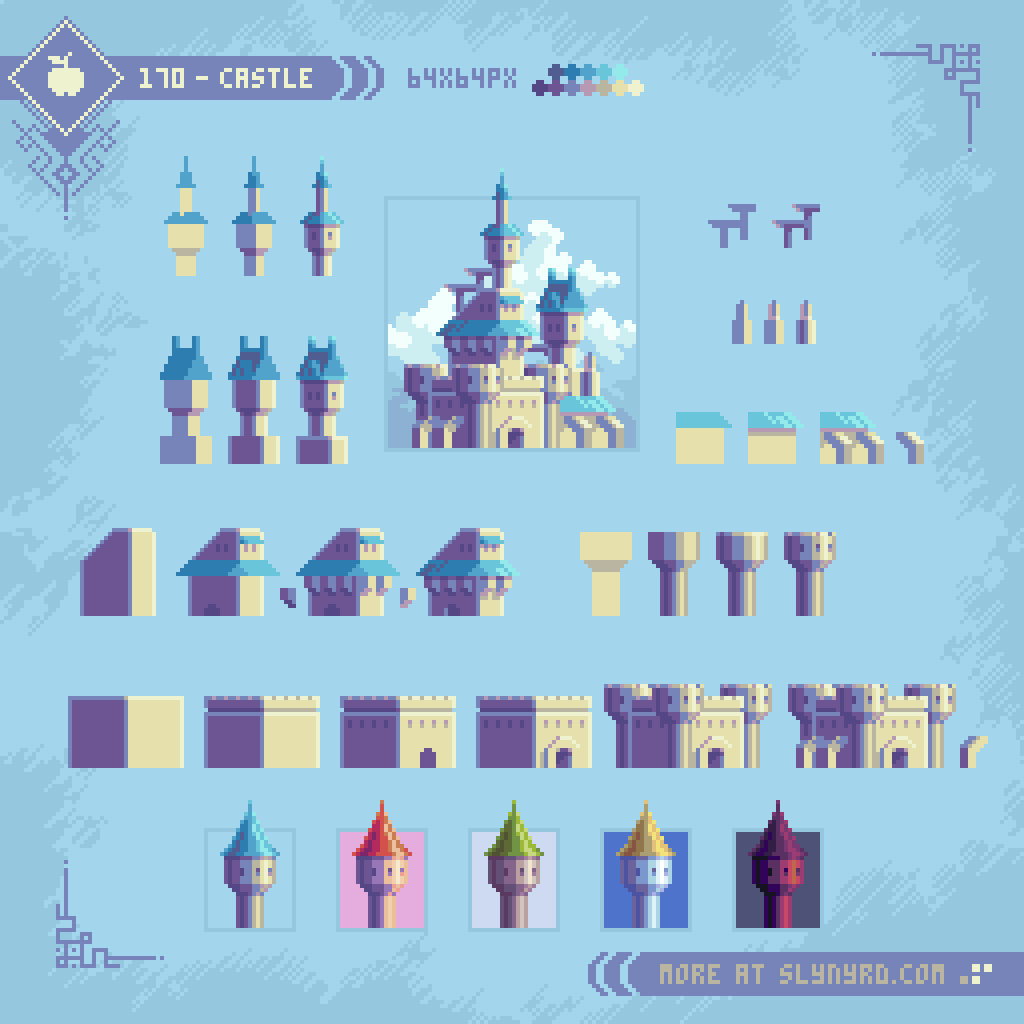
Inspired by my recent series of castle studies, I’m compelled to pass on the pleasure of creating a dream castle of your own. Done in my trademark architectural style, I’ve broken down a typical example to showcase not only the process, but the primary elements involved. Therefore, giving you the tools to make iterations and invent unique builds of your own.
There’s no right or wrong place to start, as the various structures can be mixed, matched, and layered to construct the composition that suits you. I usually start with a roof capped tower, which establishes the color scheme and light direction. For example, you can see the various color samples along the bottom of the tutorial. Then I use that as a style guide to create a rough plan of the overall structure to capture a pleasing composition within the buildings, and in context of the canvas. From there, it’s just about filling in the details that come naturally from the established method.
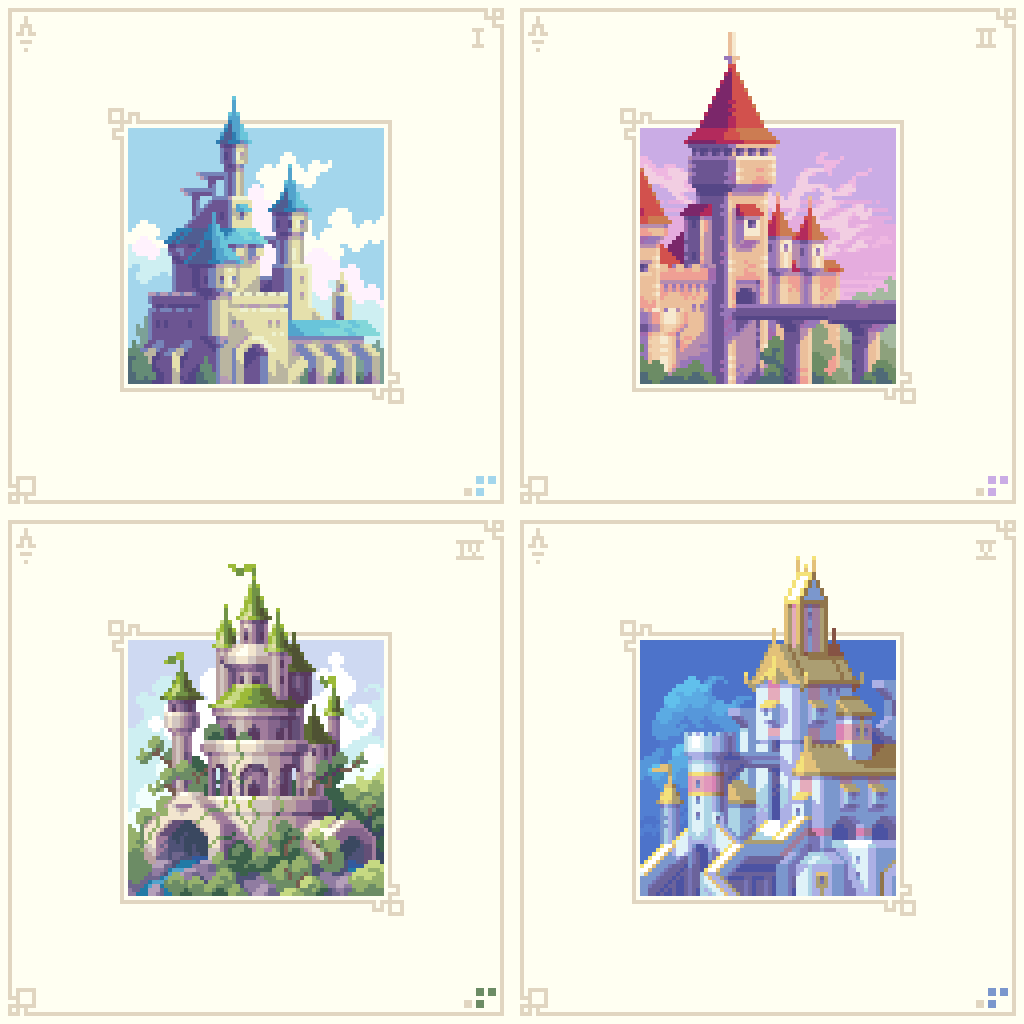
Here are several more examples from my Castles series to help inspire your designs. These all use color palettes showcased in the examples at the bottom of the tutorial. Can you discern which is which? While these are all inviting daytime styles, spooky dark castles can also be made with color choice. The last color example at the bottom of the tutorial is intended for a dark castle at dawn, but if you want to see a complete example in context, you’ll have to subscribe to my Patreon, where I post exclusive content.
Final Thoughts
I hope my sense of fun comes through the work, as I greatly enjoyed working on this feature. The hardest part was picking the subjects of the tutorials, among a world of endless possibilities. This was a fun intro to an assortment of fantasy subjects, but I’d be down for a deeper dive into swords and sorcery to create more applicable gamedev art models. For example, animated warriors, spell casting, and detailed studies of gear. Well, good to know I won’t be running out of ideas for content any time soon.
Resources
Please consider supporting my work by becoming a Patron. Among many other rewards, Patrons can download the assets featured in my tutorials. But, most importantly, you allow me to continue making new content!
Assets featured in this Pixelblog are available in Knights,Monsters, & Castles Asset Pack
Source files used in the making of this Pixelblog are available in Knights, Monsters, & Castles Source Files
Many of my popular assets are also available to purchase from my digital shop
Alternatively, you can support me by making a one-time donation
Get caught up on all my downloads
You made it to the end of the article. Thank you for reading!
-By Raymond Schlitter