Intro
It’s time to have more fun with minimalistic designs in a spiritual sequel to Pixelblog 47. While continuing with top-down designs, based around an 8x8px tilemap, we depart the fantasy theme of the past feature, and warp into a near future sci-fi world. To further distinguish this cyberpunk setting, I’ve restricted the colors to the NES palette, and utilized outlines. I typically prefer no outlines, but they are often necessary to preserve readability within a limited palette. Not only do outlines help define sprites and interactive objects from the background, sometimes the retro aesthetic they evoke just feels right, especially when paired with the NES palette. So get cozy, as we put this style to the test with various animated character designs, and a complete exterior city environment.
Characters
While I’m using the NES palette, I’m not using the technical restrictions imposed in an actual NES game. Furthermore, the sprites are more colorful than what you typically see in NES games, but I maintain a minimalistic mindset to create simple, clear details. All of the sprites start from a simple 8 pixel tall figure. Once the details and outlines are applied they become slightly larger, but are still functional for an 8x8px tilemap environment.
The orange character is intended to be the hero of this imagined game world, and gets a full 6 frame run cycle. Most characters could get by with a 4 frame cycle, like the trench coat wearing agent character, but 6 frames gives it a little more weight, and pep. Given the sprites are so small, a few extra frames for the sake of smoothness won’t keep me up at night. However, you only need so many frames to maximize the motion across so few pixels of possible movement.
The robot character opts for a rocket boosted dash instead of a traditional run. Note, the subtle light effects during the dash, and the hero shoot animation. This is produced simply by baking in lighter colors on specific frames.
I simplified the hero idle animation by making only one direction. No matter what direction you are running or shooting in, the character faces forward when you stop. I actually think this makes the character feel lively by focusing on the view with the most personality.
Finally, I created several static NPC designs to inspire more possible inhabitants of this world. By extrapolating from the poses of the established animations, it’s not hard imagine multi-directional animations for these colorful folks. You could probably get by with a simple 2-frame walk animation
Frame timing reference in milliseconds (of course you can modify to your own preferences)
Hero Run- 100, 150, 100, 100, 150, 100
Hero Shoot - 50, 100, (return to idle, or shoot again)
Agent Run- 100, 100, 100, 100
Robot Dash- 50, 50, 50, 50
Mech
No sc-fi setting would be complete without some kind of mech content. Furthermore, the power fantasy of a personal mech lies at the heart this imagined game concept. Roughly in the whereabouts of 16x16px, this slightly larger sprite is a useful vehicle for your 8x8px character to jump in and out of at will. This could make for interesting level design that exploits the advantages and weaknesses of the mech, vs on foot. For example, the mech would have greater firepower, and defense, while the on foot hero would have higher agility, a smaller hitbox, and ability to access narrow passages. This dynamic inspires many clever play mechanics, and I dream to truly make a game like this someday.
As for the animation, the walk cycle plays through 12 frames. That’s a bit on the high side, but is still economical when you consider the reused frames, reflected frames, and relatively small scale of the sprite. Moreover, on the front and back facing cycles, frames 6 and 12 are identical, and frames 1-5, can be flipped to produce frames 7-11, as the design is symmetrical. For the side facing cycle, all 12 frames are unique, however, the entire animation can be flipped to cover both left and right directions.
The walk movement is somewhat slow, and plodding to capture the sense of weight. So, to balance things out it also has a tactical rocket dash. This would be a limited burst in one direction, that is completely linear, or could have slight steer. The animation uses 4 frames, and has baked in lighting effects.
The shooting animation jolts back the shooting arm 1 pixel, while the flare effect is 2 frames. The lighting effect is baked into the first frame of the flare. The gun and shooting effects are a separate layer from the mech, so it would be possible to easily equip the mech with different weapons. Furthermore, since the gun is on a separate layer it’s easy to customize the position, so it realistically stays in the same hand for all directions.
The final touch is the dust animation. This is 4 frames per step, and it starts on the stomp in frames 3, and 9. The animation can be flipped and reused for both legs on the front and back facing cycles. The dust is only seen on the front leg of the side facing cycles. As with the walk cycle, the same dust frames can be flipped and used for both left and right directions. The dust is also on a separate layer to offer this economy and flexibility.
Specific walk frames are reused for the idle position.
Front/Back- Frame 6, or 12
Left- Frame 12
Right- Frame 6
Frame timing reference in milliseconds
Walk- All frames, including dust are 100
Dash- All frames are 50
Shoot- Body is 100, paired with 2 flare frames at 50
All assets and animation frames are available for study and commercial use through Patreon membership in the Tiny Sci-Fi Pixels Asset Pack.
City
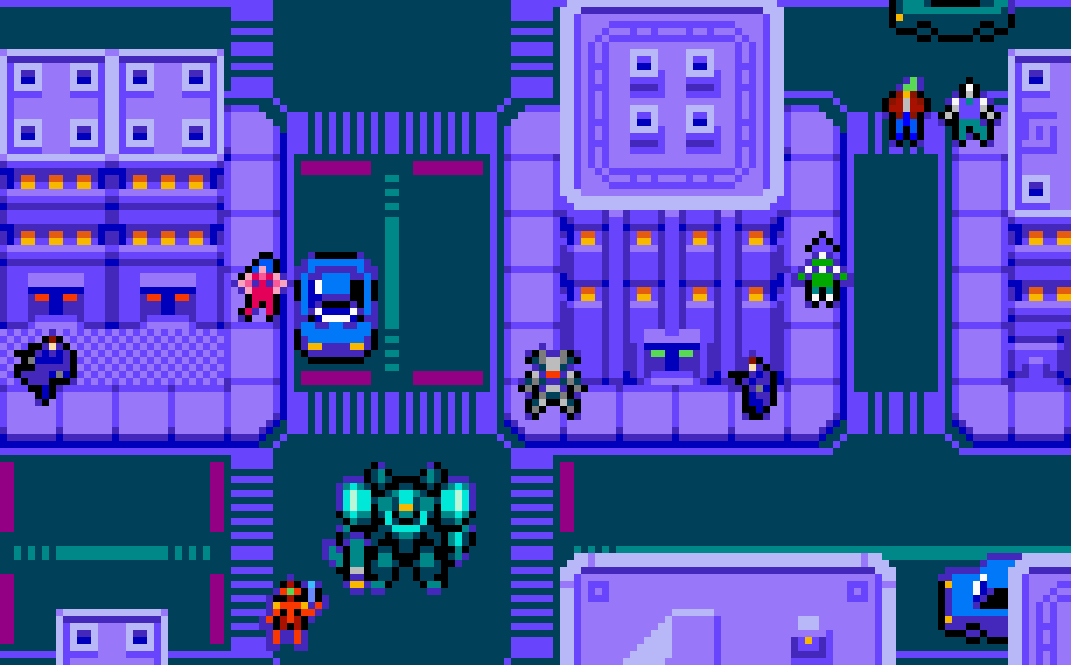
Finally, we need an environment to complete the concept. I went with a somewhat generic urban setting, however, the colors, precise geometry, and lack of vegetation give it a synthetic future vibe. To push the sci-fi theme further, you could layer in more advanced infrastructure, like elevated roads and railways, or imagined technologies, like hover cars, and teleportation pods. Animated details such as neon signs, and circuitry pulsing through the roads and buildings could also take it to the next level. Ultimately, I kept it simple to leave room to inspire your own art direction. Grunge it up for more cyberpunk, or make it shine for a futuristic utopia.
The tutorial pretty much speaks for itself in terms of the process. I started by designing complete buildings within an 8x8px tilemap to guide my sizing. Then I broke things down into tiles and made modifications to economize the tile utility. The first two building styles exhibit the most economy and customization, as the width, height, and depth can be expanded, or collapsed to your choosing. in some cases, variants can also be used to break up the pattern of the window layout, and roof arrangement. Doorway styles, placement, and amount can also be varied.
On the other hand, building 3 with the large garage entrances is much more unique, and leaves little room for variation. However, I still broke it into tiles to show how bitmap data can be saved if you want to maximize your texture atlases. Also, some of the roof elements can be mixed and reused across the building styles for more variety.
The sprites are a touch big in relation to the buildings, but that’s an intentional design convention to keep the level design compact. This makes traversal of the exterior city more manageable, and it has a certain aesthetic charm. Just like retro RPGS, the building might look small on the outside, but when you walk in, you’re presented with a much larger interior environment. I would handle this game in a similar fashion, and have an extensive network of diverse interiors that can mostly only be accessed on foot, while the exterior city is most effectively traversed with the mech.
Final Thoughts
Tiny pixels, huh? That’s what I refer to any pixel art that is designed within an 8x8px tile framework, or less. I have a lot of experience with 16x16 tiles, but I’ve become quite smitten with this 8x8 business. The economy allows rapid development of concepts, but still leaves room for beautiful visuals. The tiny scale requires a level of abstraction that gives just enough detail to tickle the imagination, and inspire a vision that goes far beyond the pixels. I hope you can feel my inspiration flowing throughout this feature, as I hope to do more. I have plenty of ideas to do a straight follow up, or I could branch into whole new theme!
Resources
Please consider supporting my work by becoming a Patron. Among many other rewards, Patrons can download the assets featured in my tutorials. But, most importantly, you allow me to continue making new content!
Many of my popular assets are also available to purchase from my digital shop
Alternatively, you can support me by making a one-time donation
Assets featured in this Pixelblog are available in Tiny Sci-Fi Pixels Asset Pack
Source files used in the making of this Pixelblog are available in Tiny Sci-Fi Pixels Source Files
Get caught up on all my downloads
You made it to the end of the article. Thank you for reading!
-By Raymond Schlitter