
Intro
We’ve been down this road before, on our way to the green pastures of quaint pixel art worlds. Of course, I’m talking about the joys of tile design. Originally, tiles were used to save vital memory on the wimpy computers of the 20th century. Without such limitations in the modern era, some may question the use of tiles at all. Sure, it’s technically possibly to create massive custom assets, but how feasible is that from a production standpoint? The larger the asset, the more time it takes to make. Also, consider the difficulty of modifying the layout of large images that are already baked together. What’s more, designing with tiles lends itself to that retro aesthetic we love so much about pixel art games. Love it, or hate, there is no denying the economy of using tiles to create environments. While it’s a breeze to layout environments with tiles, the challenge is actually designing a beautiful user friendly tileset. In this lesson, we’ll take on this challenge by incorporating a variety of environmental textures into one cohesive set of top-down tiles.
Grass and Dirt
Coming back down to earth, this is not my first grass and dirt tile lesson. However, in this iteration I present a layered approach with more tile variants than my previous effort in Pixelblog 20. By removing the background from some textures that don’t fill the entire tile space, as seen in the grass and rocky dirt examples, it’s possible to layer certain tiles for different texture combos. This removes the need to have to bake together textures into their own tile variants. I think the compromise of having a few extra layers to manage is worth the trade off.
Step one with any tileset is the base repeating texture, which must loop well on all four sides. After that, all side and corner variants can be made by shaving off portions of the base texture. When creating the base repeating texture tiles, much care should be given to the visual balance. The goal is to create a convincing texture while hiding the tile pattern as much as possible. Even visual balance, and consistency in cluster work are some of the top design keys. Additionally, software effects the degree of difficulty in design. It’s critical to use a program that allows you to see tile connections in real-time as you are working, such as Pyxel Edit, or the tile mode in Aseprite. For more fundamental tile design tips, I recommend reviewing the Key Points in Pixelblog 20.
Rock Wall

I like to start a wall set with the front facing wall texture. As with a ground texture, the goal is to make it loop well on all four sides. Taking it a step further, the wall texture must also link to adjacent angled sides, wall top, and the ground.
Once the front facing texture is established, it’s not a far stretch to reimagine that texture at a 45 degree angle. Portions of the angled texture tile can then be repeated with minor modifications to create the linking bottom tile, and part of the linking wall top tile. Furthermore, the angled texture can be reflected and color swapped to create the other side of the wall. Take note of these easy recycling hacks in the highlights above.
When adding a terrace to a cliff, as in the above layer 4, the front facing angled sections lose the perfect connection with the wall texture it overlaps, Therefore, this overlapped wall texture should be changed to the proper triangle shaped tile that is designed to meet with the ground, on layer 3.
Drop shadows add essential depth, but they must be conservative in design to limit conflict with sprites and other tiles. Moreover, it’s best to limit them to one or two wall faces, minding light source, and they should not exceed a tile in length. No matter how tall the rock wall all shadows are the same length. While this is unrealistic, the effect is convincing enough to only be noticed if one really analyzes the scene. The impact of the shadows is apparent when you see an environment with, and without them. Definitely worth the effort.
Sand and Water

Finally, some environment features outside of the common dirt, grass, and rock varieties. I promise more unique textures in upcoming features, but I felt a refresh from the basics was in order. As for the sand texture, I like to use long angled calligraphic ‘S’ shaped clusters to create a pleasing wavy pattern. To keep things from looking too artificial, add a bit of irregularity to break up the wave shapes. If too many wiggly lines connect it starts to look like ramen noodles.
On the other hand, the water is made with wavy interconnected blob shapes that are formed by single pixel wide lines. I like to start by making one blob then draw branching lines from it that eventually connect and form a network of blobs. From here It’s good to break up the lines in places to keep a flowing motion through the pattern. Lastly, add a few highlights for some sparkle, and shadows for depth. For shadow placement, make a crude drop shadow a couple pixels down from the bright lines.
To create the water animation, make another water texture tile in the same method but with a different pattern. You can then transition between these 2 frames to create a simple, yet strangely pleasing water animation. Some texture pairings work better than others. Try rotating, and reflecting the textures to see what combos best flow together.
One animation style is a hard cut back and forth from water A to water B. This may seem abrupt, but it works if the game has an overall retro aesthetic, as seen in Pixelblog 36. However, in this iteration, I add in a frame where the tile layers blend together by reducing opacity of the top water layer to 50%. I got this idea from techniques I’ve seen in old school anime. Almost laughably simple, but when used with a translucent texture it seems suitable. Note, frame timing also strongly influences the expression. Too fast, it feels like noise. Too slow, it becomes choppy. But with just the right speed, only 2 frames can be convincing.
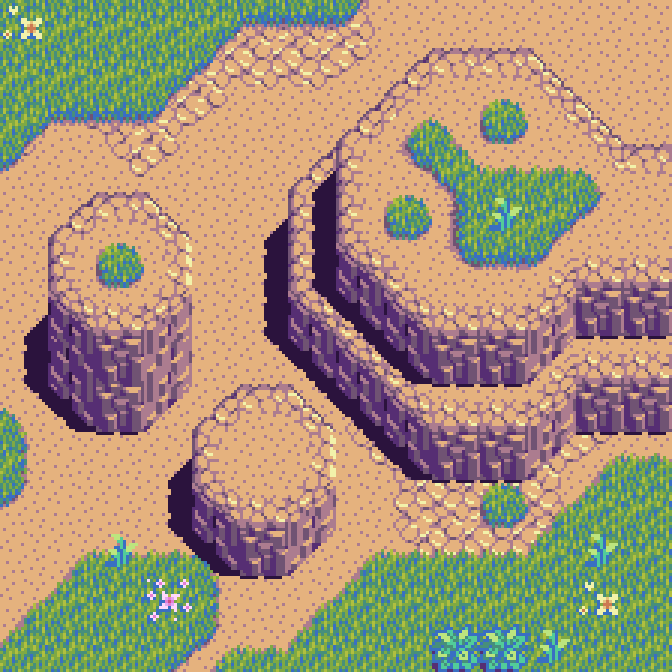
The above scene incorporates all the terrain concepts, and various texture combos into one seamless landscape. Notice how the drop shadows help integrate the rock wall into the ground, allowing a smooth connection on dirt, grass, and sand.
FINAL THOUGHTS
Tile design always starts simple but can quickly become a tedious affair. My first draft of this set was done in little more than a day, but then it took over a week to balance and smooth out all the connections. There’s a lot of trial, and constant error fixing involved when tiles have multiple connections. For example, corner tiles need to connect to side tiles, but should also connect to the other corner tiles. As with any pixel art, It’s also important to consider color and contrast for the sake of readability. To try and avoid snags, it’s smart to start with a crude template of all tiles and connection possibilities visible. Then you can monitor all connections in real time as you add details, so long as it’s done in a tile friendly application as I mentioned earlier. No matter, one is sure stumble along the way, and make beautiful discoveries just as well. I’m sure there are still imperfections in this set, and I’m aware of more orientation variants, but I try to maintain a minimalist philosophy by avoiding rare usage cases, and squeezing as much function out of a single tile as possible.
My love for creating top down worlds is apparent with several Pixelblogs on the subject now, and the intention of doing more in the future. As I mentioned earlier, I strive to bring you more unique environment studies, such as snow, ice, lava, slime, and the list goes on. Tell me, what’s in demand?
RESOURCES
Please consider supporting my work by becoming a Patron. Among many other rewards, Patrons can access resources to compliment my tutorials. But most importantly, you allow me to continue making new content!
Alternatively, you can support me by making a one-time donation
Assets featured in this Pixelblog are available in Top Down Nature Asset Pack
Source files used in the making of this Pixelblog are available in Top Down Tiles Part 2 Source Files
Get caught up on all my downloads
You made it to the end of the article. Thank you for reading!
-By Raymond Schlitter